

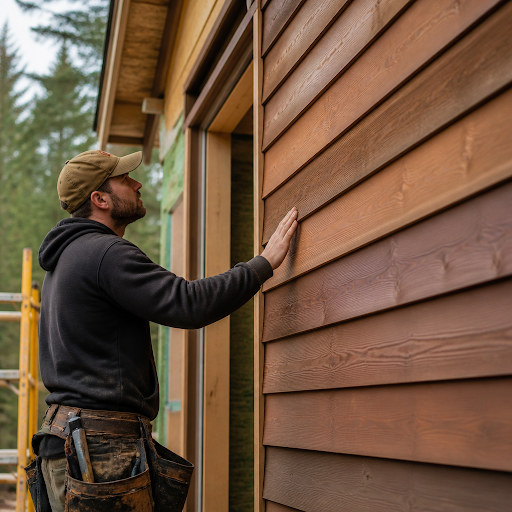
Cedar is one of the few exterior materials that looks better after a decade of weather than it did on delivery day — but only if the species, the grade, the fasteners and the detailing are chosen with some care. Get those four things right and a shingled wall can run for generations with nothing more than occasional attention. Get them wrong and you’ll be chasing cupped butts, rusty streaks and black staining by year five. This is a practical guide to the decisions that actually matter, written for homeowners and remodelers who want a wall that holds up rather than a wall that photographs well for one season.
Why cedar still wins on exterior walls
Cedar’s advantage is chemistry and structure, not marketing. The heartwood carries natural extractives that make it unattractive to decay organisms and insects, and the cell structure is dimensionally stable compared with denser softwoods, so boards and shingles move less across the seasons. Low density also means cedar takes a fastener without splitting as readily, holds a finish well because it absorbs coatings evenly, and can be milled into crisp profiles — bevel, shiplap, channel rustic, board and batten — without tearing out.
The trade-off is softness. Cedar dents where a hard board wouldn’t, and it is unforgiving of trapped moisture. That means the wall assembly behind the cedar matters as much as the cedar itself. A ventilated rainscreen gap — even a modest one created with furring strips or a drainage mat — is the single best upgrade most projects can make. It lets the back face of each board dry at the same rate as the front, which is what prevents cupping and premature paint failure.
Shingles, shakes, or pattern siding?
Shingles
Sawn on both faces, uniform in thickness, and tapered. Shingles give you that tight, fine-textured coastal wall and are the easiest cedar product to detail around windows, corners and curves. They are also the most labor-intensive: a shingled elevation is thousands of individual pieces, each needing correct exposure and offset joints. For a step-by-step look at coursing, keyways and corner treatment, this walkthrough of cedar shingle siding installation is a solid reference before you commit to doing it yourself.
Shakes
Split rather than fully sawn, thicker, and far more textured. Shakes read as rustic and throw deep shadow lines, which suits lodge, mountain and farmhouse vocabularies. Because they are irregular, they need generous exposures and careful underlayment interlayment where required. On a tight modern facade they can look busy; on a broad gable they look substantial.
Pattern siding and boards
Bevel, shiplap, nickel-gap and board-and-batten cover ground fast and suit horizontal or vertical emphasis. Boards also make it easier to control reveal lines so siding aligns with window heads and sills. If you want long, uninterrupted runs, ask about available lengths early — layout decisions usually follow material lengths rather than the other way round.
Species and grade: the choice that outlives the install
Western red cedar is the familiar option — warm reddish-brown tones, wide board widths, excellent stability, and the species most people picture when they say “cedar siding.” White cedar runs lighter and tighter-grained, weathers to the silvery gray associated with shoreline architecture, and is a traditional choice for shingled walls. Atlantic white cedar is prized for its fine, even texture and its performance in damp, exposed conditions, which is why it shows up in trim, millwork and marine-adjacent applications.
Within any species, grade is where budgets get decided. Clear vertical-grain stock is the most stable and the best candidate for paint or a clear finish, because there are no knots to bleed through. Knotty grades are handsome under a solid-body stain and read as deliberately rustic, but they move a little more and need tighter fastening discipline. Mixing grades on one elevation rarely works; pick one visual language and stay with it.
Sourcing: ask the supplier the awkward questions
Cedar is not a commodity you buy by the pallet and hope. Thickness consistency, moisture content at delivery, profile tolerances and the availability of matching trim all affect how the wall goes together. This is where a specialist supplier earns its keep: companies like Liberty Cedar deal specifically in cedar and specialty lumber for residential and commercial exteriors — shingles, shakes, Western red cedar lumber, pattern siding, timbers, mouldings and custom millwork — and can talk through how a given profile behaves in a given exposure. If a project calls for the tight grain and damp-climate character of Atlantic white cedar, having a materials source that stocks the species alongside compatible trim and millwork saves the common headache of matching a specialty wall to generic off-the-shelf casings.
Bring your elevations and a rough takeoff to that conversation, not just a square-footage number. Exposures, corner method (woven, mitered, or corner boards), window trim depth and soffit returns all change quantities. It is also worth asking what else is available in the same species — timbers for a bracket or porch post, for instance — so structural and decorative elements weather together instead of diverging in tone.
Installation details that decide the outcome
- Fasteners: stainless steel is the safe default. Hot-dip galvanized can work, but cedar extractives will eventually stain around cheaper fasteners, and those streaks do not wash off.
- Acclimate before you nail: let material sit on site, stacked and covered with airflow, so moisture content settles toward local conditions. Installing wet stock and watching it shrink produces gaps you cannot close later.
- Prime or seal all six sides: if you are coating the wood, that includes cut ends and the back face. End grain drinks water fastest and fails first.
- Respect clearances: keep the bottom course well clear of grade, roofs and decks, and flash horizontal transitions with a proper drip edge rather than caulk.
- Nail placement: one fastener per bearing on shingles, set above the butt line of the course above so heads stay covered; over-nailing restrains natural movement and splits boards.
Finish choices and the gray question
You have three honest paths. Leave it bare and let it weather to gray, which is low-maintenance but uneven on walls with mixed sun exposure. Use a penetrating semi-transparent stain, which keeps grain visible and refreshes with a wash and recoat rather than a scrape. Or paint with a solid coating, which gives the longest color life but turns future maintenance into a prep job. There is no wrong answer, only a maintenance schedule you agree to in advance.
Maintenance itself is undramatic: rinse the walls annually, keep plantings pruned back so air moves, clear gutters so water never sheets down a single bay, and touch up any nicks before they wick. Honestly, the hardest part is remembering to do it at all — the same category of small, repeated habit as working out how much water you should drink in a day and then actually doing it, where consistency beats intensity every time. Set a calendar reminder for spring and the job stays a two-hour task instead of a two-week one.
Planning your sequence
Work backward from the finished wall. Decide species and grade first, then finish, then exposure and corner method, then fasteners and the rainscreen detail, then order quantities with a sensible allowance for waste on hips, valleys and tricky returns. Order trim and millwork in the same species and at the same time as the siding so tones and grain read as one job. If a specialty profile has to be milled, build that lead time into the schedule rather than discovering it the week your framing is dry.
Cedar rewards the person who slows down at the planning table. The wood will do its part for decades; the install and the details decide whether you spend that time admiring it or repairing it.








Discussion about this post